The YouTube video also explains how to add costumes.
YouTube Channel : https://www.youtube.com/channel/UCMvuNkk0z69h_vF0gKlhYcg
FAQs
Blender is required to add costumes.
The latest version uses Blender 2.92.0.
Follow the steps below to add a costume.
- Open the .blend file located at:
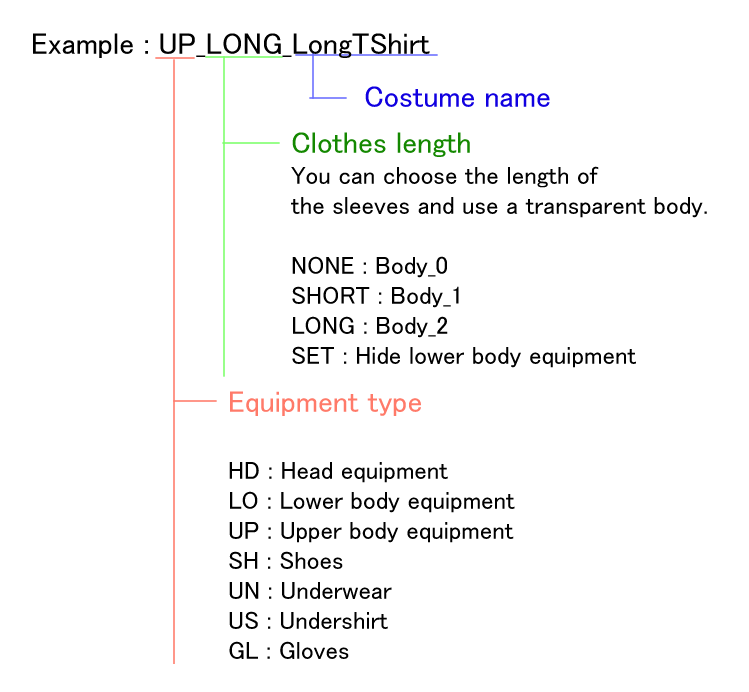
>CustomizableAnimeGirl\Models\Blender\CustomizableAnimeGirl.zip - Create or add a new outfit and name it according to the following naming convention.
- Set the armature for the added costume.
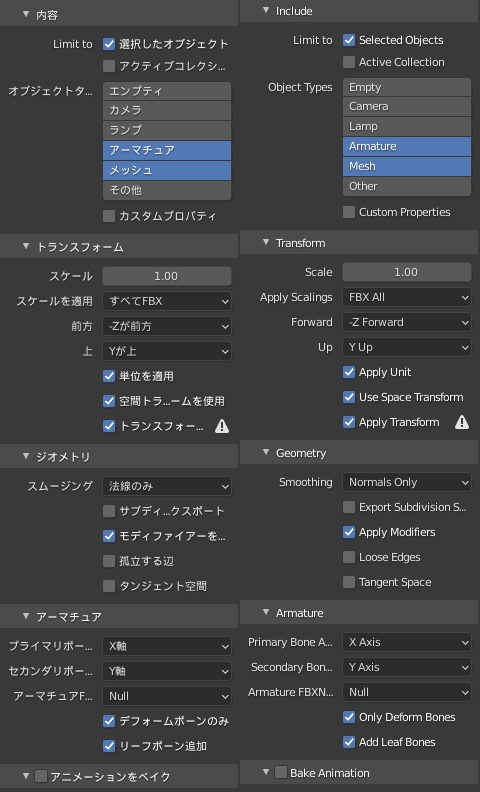
You can easily set it by transferring the weight from Body. - Export as an FBX file with the following settings.
- In Unity, Copy the FBX file to the following location:
>CustomizableAnimeGirl/Models/FBX/(UnityChan|URP) - Select the FBX file you just added and change Rig to Humanoid.
- Change the Avatar Definition
“CopyFrom Other Avatar -> Customizable Anime Girl Avatar” - Uncheck Animation and Materials.
- Select “CustomizableAnimeGirl” in scene, and add a new FBX file to the CustomizeManager FBX list.
- Press “Auto Detect Meshes”.
- If it is prefabricated, click ApplyAll in Overrides to apply the changes to the prefab.
- Complete
You can add it by following the steps below.
- Create a new texture by referring to the eye texture that has already been prepared.
* The colored parts are white, the shadows are black, and the highlights are transparent colors. - In Unity, Add the texture in the following location:
> CustomizableAnimeGirl\Models\Textures - Duplicate materials such as eyes and faces in the following location:
> CustomizableAnimeGirl\Models\Materials - Change the texture of the duplicated material to the newly created one.
- Select CustomizableAnimeGirl on the scene, and press AutoDetectMaterials in Customize Manager.
- If it is prefabricated, click ApplyAll in Overrides to apply the changes to the prefab.
- Complete
CustomizeManager provides a function to change the equipment. Call the following function when you want to change the equipment.
nextMesh(MESH_TYPE meshType)
Changes the part specified by MESH_TYPE to next ID.
ex ) customizeManager.nextMesh (MESH_TYPE.UPPER_BODY);
prevMesh(MESH_TYPE meshType)
Changes the part specified by MESH_TYPE to prev ID.
setMesh(string name, MESH_TYPE meshType)
Changes the part specified by MESH_TYPE to the equipment specified by name.
“string name” is the material name of the equipment.
nextMaterial(MATERIAL_TYPE materialType)
Changes the part specified by MATERIAL_TYPE to next ID.
It is used for areas where the mesh does not change, such as the eyes and eyebrows.
ex ) customizeManager.nextMaterial (MATERIAL_TYPE.EYE);
prevMaterial(MATERIAL_TYPE materialType)
Changes the part specified by MATERIAL_TYPE to prev ID.
setMaterial(string name, MATERIAL_TYPE materialType)
Changes the part specified by MATERIAL_TYPE to the equipment specified by name.
Save data stored in CustomizeManager and FaceEditManager can be serialized.
You can receive the current data by calling “customizeManager.getCurrentAnimeGirlData ()” and “faceEditManager.getCurrentFaceEditData ()” respectively.
Please refer to the following script for the data save and load functions.
>CustomizableAnimeGirl\Scripts\ContentManager.cs
- public void saveAnimeGirl (int index)
- public void loadAnimeGirl (int index)
You can use it for games, animations, VRChat, etc. but selling or redistributing models or scripts is prohibited.
Is possible. It comes with a .blend file, so please refer to how to use the blender model with VRChat.
However, redistributing or selling the model itself is prohibited.
Please feel free to contact us with any question
Twitter : https://twitter.com/5858Krol
Email : krol.5858@gmail.com